
Filling Out & Submitting a Form
Once someone has built and published a Custom Form, your team can fill it out and submit it. You'll either open a form that was assigned to you, or start a new one from a published template. This article covers finding a form, filling in the answers, adding signatures and photos, and submitting — including what happens when a form needs approval.
Find the form you need to fill
There are three ways to get to a form:
From your To-Dos. A form assigned to you shows up in the My To-Dos card on your dashboard. Click it to open it. If a form came back to you for changes it's flagged Revision required; if you're the one who needs to sign off, it reads Your approval required.
From the Custom Forms list. In the left navigation, open Custom Forms. The list has tabs for Active, Repeating, Scan on Demand, and Archived, and a status column (Assigned, Draft, Submitted, Pending approval, Approved, Rejected). Click any row to open that form.
Start a new one. Click New Custom Form to open the template picker (Start a new custom form), search for the template you want, and select it.
[ Suggestion: screenshot of the My To-Dos card on the dashboard showing an assigned custom form row ]
Fill it out yourself, or assign it to others
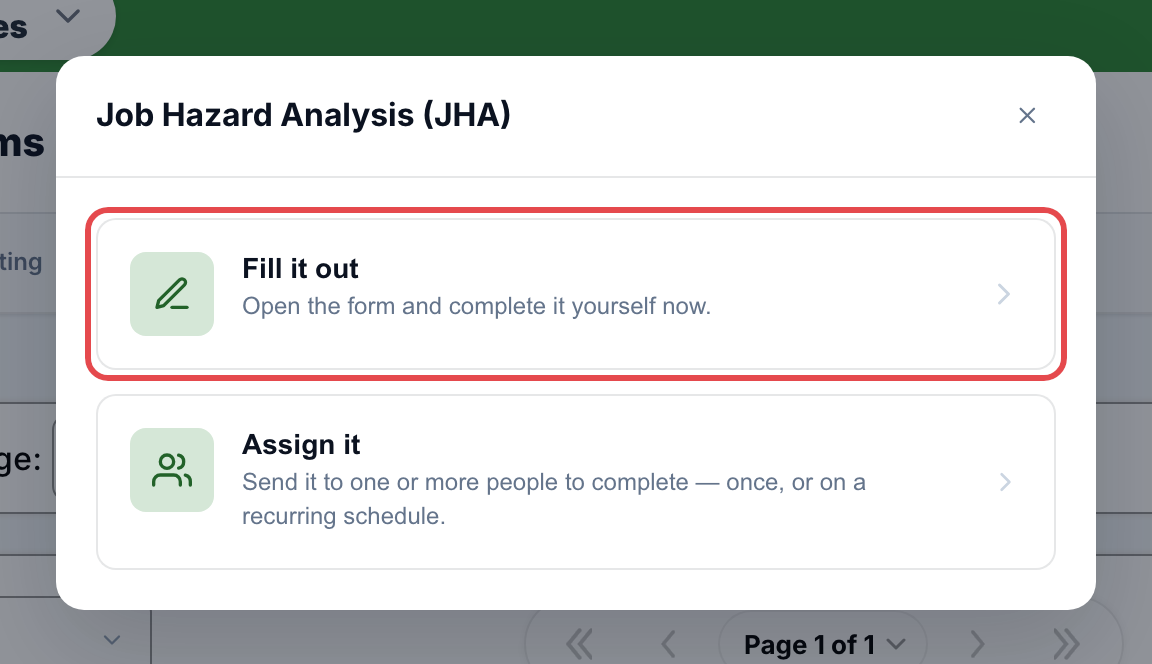
When you start a new form from a template, you'll be asked what to do with it:
Fill it out — Open the form and complete it yourself now.
Assign it — Send it to one or more people to complete — once, or on a recurring schedule. You'll pick who to Assign to and a Due by date; each person gets their own copy in their My To-Dos. (Depending on your access level, you may go straight to filling without this choice.)
The rest of this article follows the Fill it out path.
The fill page
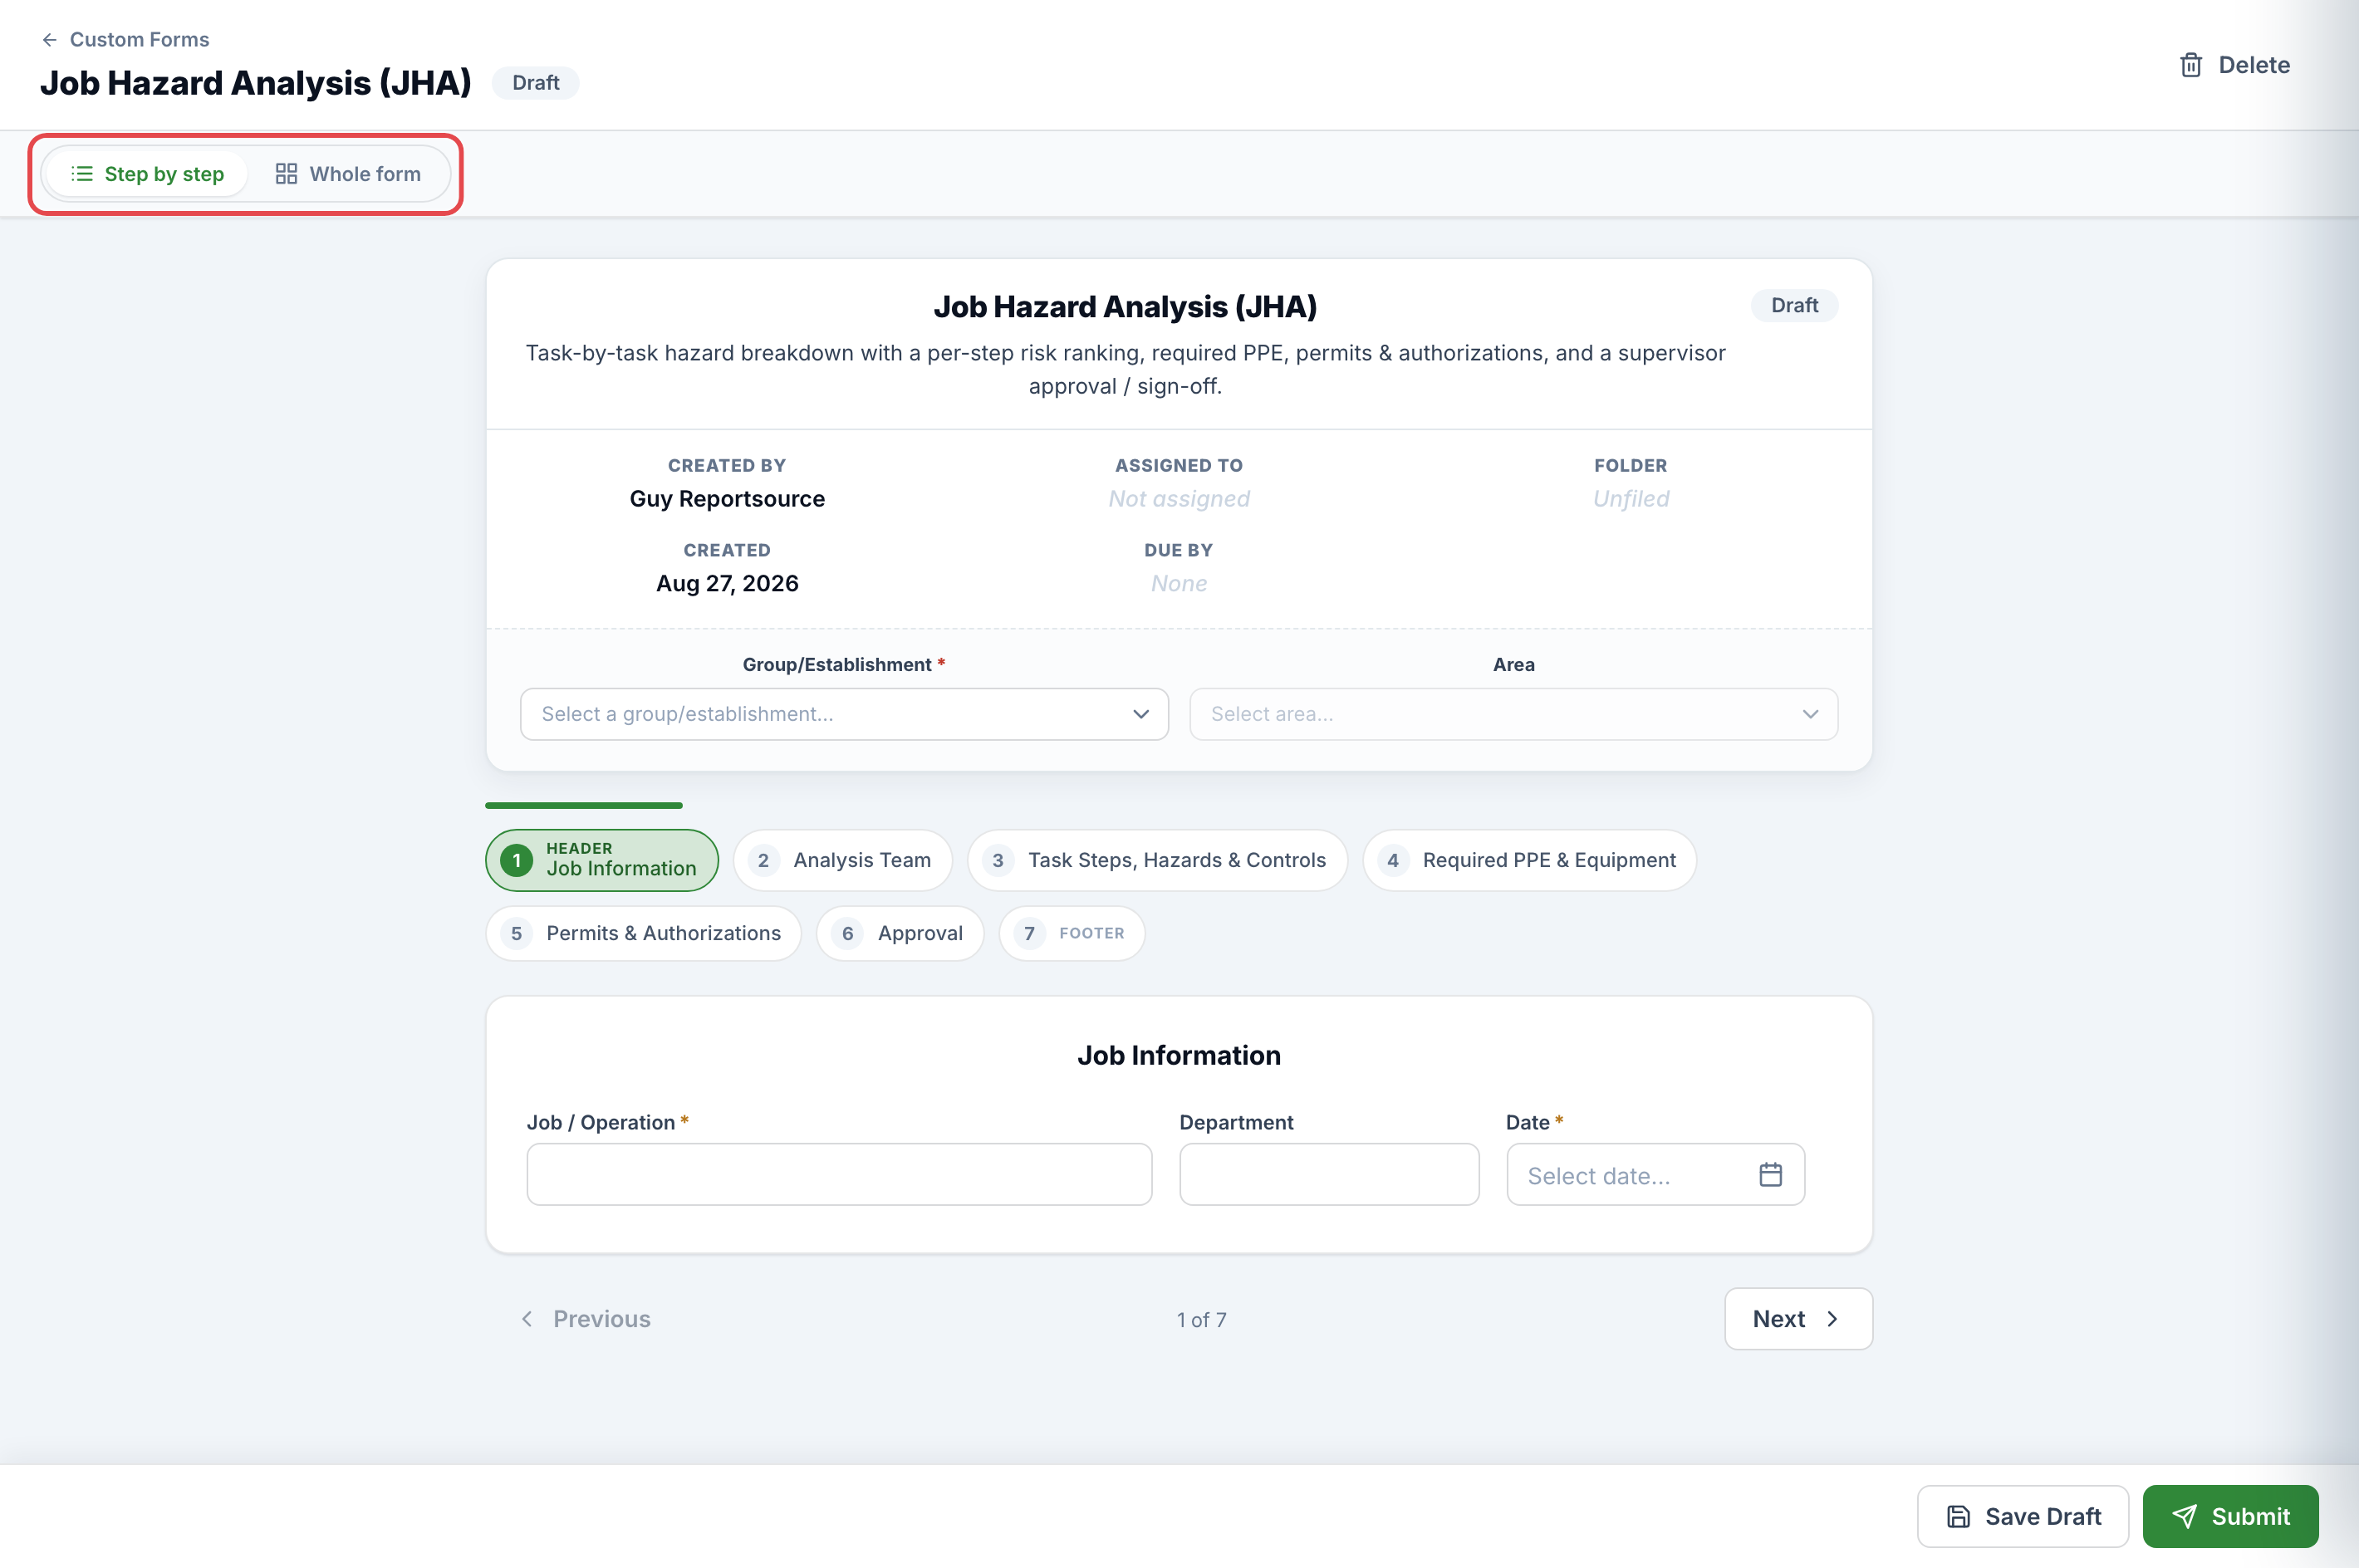
At the top you'll see the form's name, its number (once it has one), and a status badge. A header card shows the details: who it was Created by and Assigned to, the Created and Due by dates, and the Group / Area it's filed under. (Group and Area reflect your workspace's own naming.) When you're filling out your own form, the Group and Area are yours to choose and are required; on an assigned form they're locked.
You can fill the form in either of two views — switch anytime with the toggle, and your choice is remembered:
Step by step — one section at a time, with a progress bar and numbered steps. Use Previous and Next to move between them; the counter shows 2 of 5, and you can click a step to jump to it.
Whole form — every section on one page, top to bottom.
Fill in the answers
Fill in each field as you would expect for its type — type into text and money fields, pick from dropdowns and radio buttons, choose Yes / No / N/A, use the calendar for dates, and start typing to search an address or pick a person. Required fields are marked; if you try to submit with any still blank, they turn red so you can find them.
Some sections are tables that take a repeating set of entries (one row per hazard, per attendee, and so on). Use Add entry to add a row; the hint tells you the minimum and maximum allowed, and each row has a remove control.
Signatures, photos, and attachments
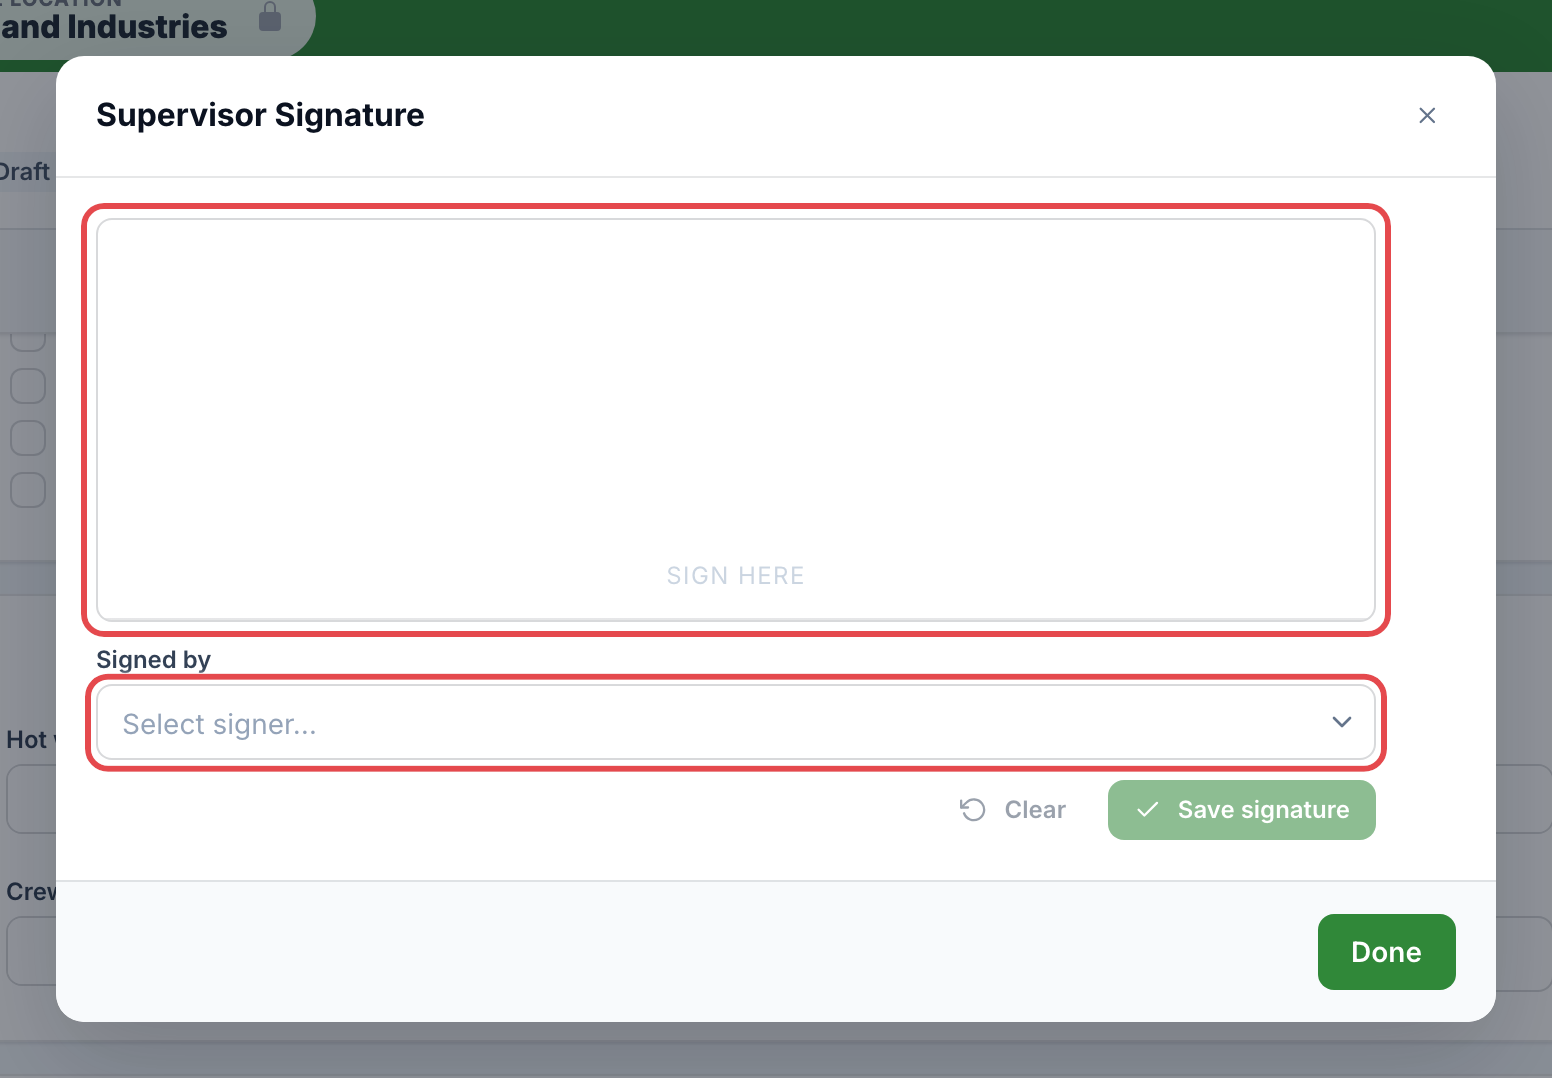
Signatures. On a signature field, click Add signature (it later reads Change signature for a single signature, or Manage signatures where several are collected). In the window, sign on the Sign here pad, choose who signed under Signed by (this is never pre-filled — you must pick the signer), then click Save signature. Use Clear to redo the drawing, or Replace to redo a saved one.
Photos. On a photo field, click Add photos to attach one or more images; thumbnails appear, each with a remove control.
QR sign-in. A QR sign field collects signatures by phone. Once the form has been saved, its QR code appears. On a sheet set to Employees, in the mobile app, people scan it in the mobile app and pick themselves (or type a visitor's name). On a sheet open to Anyone with a phone camera, any phone camera opens a page where the signer types their name and signs — no account needed; people who have the app should still scan it inside the app so the signature is tied to them. As people sign in, their signatures show up here — use Refresh signatures to pull in the latest.
Extra detail on an answer. Where the form allows it, a field can carry extra detail: Attach a file, add a note (Add a note…), or create a Corrective Action (this label reflects your workspace's own naming). A Corrective Action asks for a Title, Description, who to Assign to, and a Due by date.
Save and submit
Save Draft saves your progress without checking anything — you'll see Draft saved. and can come back later.
Submit finalizes the form. If any required fields are missing (or a Group/Area hasn't been chosen on your own form), nothing is submitted — the affected fields and steps turn red and you'll see Please complete the required fields first. Fill them in and submit again. On success you'll see Custom Form submitted.
There's no extra confirmation step on submit — completing the required fields is the only gate. Tip: hovering Submit previews what's still missing by highlighting those fields.
[ Suggestion: screenshot of a submit attempt with required fields highlighted red and the "Please complete the required fields first" message ]
After you submit
The form number. If the template uses numbering, a unique number is stamped on the form when you submit (it shows as Pending until then).
Approval. Some forms need sign-off before they're complete. After you submit, the status becomes Pending approval and the form is read-only while an approver reviews it. If it's sent back, you'll see it flagged for revision with the approver's Reviewer note, and you can edit and resubmit. If you are the approver, an approval panel appears above the answers with an optional comment box and Approve / Reject buttons.
View or share the PDF. On a submitted form, use View PDF (it reads Generating… briefly, then Open PDF) to open the printable version in a new tab. Use Email PDF to open the Email Report window, where you can send a copy to Internal employees and/or External emails, then click Send Report.
Good to know
A form can be edited only while it's Assigned, Draft, or Rejected (returned for revision). Submitted, pending-approval, and approved forms are read-only.
Required fields are only flagged after you try to submit — so a fresh form won't look like it's full of errors.
The Signed by name is never filled in for you; the signer has to be chosen before a signature can be saved.
A QR sign code only appears once the form has been saved. Whether people sign in through the mobile app or from any phone camera depends on the field's Who can sign setting.
Save Draft never blocks on missing fields — only Submit checks that required answers are complete.